Manufacturing Tools & Dies for Stamping
2024-06-28 08:48There are several steps in producing metal stamping. The first step is designing and manufacturing the actual tool used to create the product.
Let’s take a look at how this initial tool is created: Strip Layout & die structure: the designer is used to design the strip and determine dimensions, tolerances, feed direction, scrap minimization and more.
Tool Steel and Die Set Machining: CNC ensures a higher level of precision and repeatability for even the most complex dies. Equipment like 5-axis CNC mills and slow-speed wire EDM machines can cut through hardened tool steels with extremely tight tolerances.
Secondary Processing: Heat treating is applied to metal parts to enhance their strength and make them more durable for their application. Grinding is used to finish parts requiring high surface quality and dimension accuracy.
Wire EDM: Wire electrical discharge machining shapes metal materials with an electrically-charged strand of brass wire. Wire EDM can cut the most intricate shapes, including small angles and contours.
Metal Stamping Design Processes
Metal stamping is a complex process that can include a number of metal forming processes —blanking, punching, bending, and piercing and more.
Blanking: This process is about cutting the rough outline or shape of the product. This stage is about minimizing and avoiding burrs, which can drive up the cost of your part and extend lead time. The step is where you determine hole diameter, geometry/taper, the spacing between edge-to-hole and insert the first piercing.

Bending: When you are designing the bends into your stamped metal part, it is important to allow for enough material - make sure to design your part and its blank so that there is enough material to perform the bend. Some important factors to remember:
· If a bend is made too close to the hole, it can become deformed.
· Notches and tabs, as well as slots, should be designed with widths that are at least 1.5x the thickness of the material. If made any smaller, they can be difficult to create due to the force exerted on punches, causing them to break.
· Every corner in your blank design should have a radius that is at least half of the material thickness.
· To minimize instances and severity of burrs, avoid sharp corners and complex cutouts when possible. When such factors cannot be avoided, be sure to note burr direction in your design so they can be taken into account during stamping
Coining: This action is when the edges of a stamped metal part are struck to flatten or break the burr; this can create a much smoother edge in the coined area of the part geometry; this can also add additional strength to localized areas of the part and this can be utilized to avoid secondary process like deburring and grinding. Some important factors to remember:
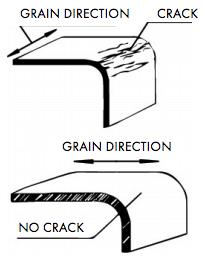
Plasticity and grain direction - Plasticity is the measure of permanent deformation a material undergoes when subjected to force. Metals with more plasticity are easier to form. Grain direction is important in high strength materials, such as tempered metals and stainless steel. If a bend goes along the grain of a high strength, it can be prone to cracking.

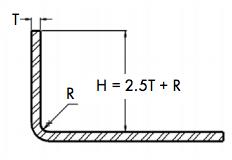
Bend height -The overall height of a bend has minimum requirements to be formed effectively and should be at minimum, 2.5x the thickness of the material + the radius of the bend.

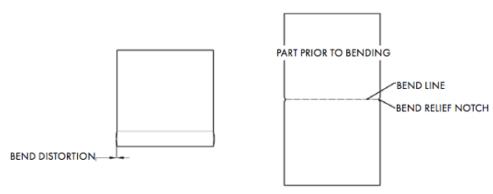
Bend relief -Add small notches located immediately adjacent to the portion of the part to be bent — they should be a minimum of twice as wide as the material is thick, and as long as the bend radius plus material thickness.


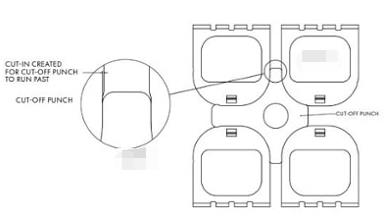
Bend Distortion/Bulge: The bulging caused by bend distortion can be as large as ½ the material thickness. As material thickness increases and bend radius decreases the distortion/bulge becomes more severe. Carrying Web and “Mismatch” Cut: This is when a very slight cut-in or bump-out on the part is required and is typically about .005” deep. This feature is not necessary when utilizing compound or transfer type tooling but is required when utilizing progressive die tooling.

